Showing posts with label distressed. Show all posts

Monday, June 10, 2013

Ombre Dresser with Milk Paint

Well, here I am again apologizing for waiting so long to put up another post.  I've gotten a bit distracted from blogging, even though I really enjoy sharing.
After I started retailing Miss Mustard Seed's Milk Paint, I took a bit of a detour trying to get everything going. I wish I had done a better job of documenting my milk paint projects.  Instead I just take a quick shot to post an item for sale, and forget to get before and after shots.  Even this one isn't the best staging.  Oh well, hope you'll forgive me.

I've had it in my head to paint this particular dresser with the ombre technique for quite some time.  For some reason I just never got around to it.
Here's the before shot.


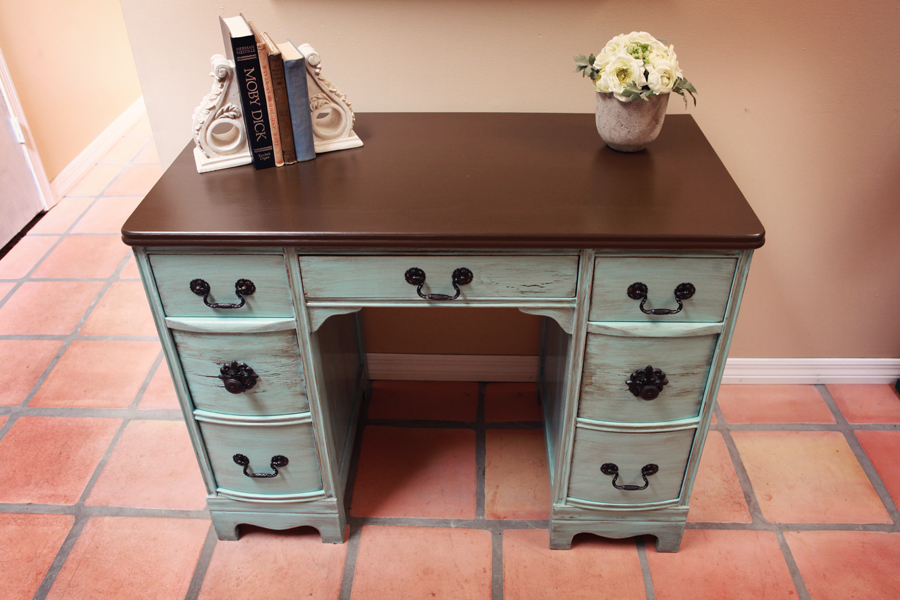
I decided to go with the Boxwood color on this piece.  The bottom drawer is in Boxwood.  Each drawer from bottom to top then has Ironstone added to the Boxwood in greater proportions as you get to the top. I did use the bonding agent in my first coat of each color to keep it from having the "chippy" look.  The framework and knobs of the piece are in Ironstone alone.  Then I distressed it a bit and topped it with Miss Mustard Seed's Furniture Wax. This wax goes on like butter!  I love it.  So here it is waiting for it's forever home in my space at Rusted.


Well that was short and sweet.  I'm a woman of few words. What can I say.

If you haven't tried Miss Mustard Seed's Milk Paint, be sure to give it a try. You will love the finish!  Please find a retailer near you and support your local businesses.  If you don't have a retailer in your area, I hope you will visit my website Here, to check it out.

Thanks for stopping by.

Jeanne

Linking up to:

The Dedicated House - Make It Pretty Monday
Homemaker on a Dime - Creative Bloggers Party & Hop
Kammy's Korner - Trash 2 Treasure Tuesday


Pin It

Wednesday, October 31, 2012

The Pink Lady


I'll have to admit, when my customer asked me to paint this desk pink, I wasn't feeling it.  It just seemed like such an elegant desk to be pink.  Of course I had a "Pepto Bismol" pink in my mind.

She actually sent me a picture of what she wanted and I got some sample cards to make the choice from. When I found out she would be sharing an office with her husband, I suggested Annie Sloan's Antoinette.  It is such a subtle pink, I thought it would be a good compromise to make them both happy.

The desk had this one spot that needed a little doctoring.


I had this piece of decorative wood for a stair step lying around and thought it might cover up the problem.  I popped off the swirly part, and cut out a piece that looks similar to the missing one.  Then I just wood glued it in place.  I figured once it was painted, it would blend close enough.


OK.  Enough with the suspense.  Here's the Pink Lady in all her glory.


And here's one last look along with her chair......


What do you think?  

Thanks so much for stopping by.

Blessings!

Jeanne

Linking up to:


Pin It

Saturday, October 6, 2012

Miss Mustard Seed's Tricycle

I just finished up another project with Miss Mustard Seed's Milk Paint in Tricycle.  I finally did a piece that got some awesome chipping.  I kept doing pieces that had a lot of grain and were somewhat dry.  Therefore, no chipping.  This was a fun, quick makeover.  This is an old telephone chair.  Or, I think they are also called gossip chairs.   Here's what she looked like before.  It actually looks better in this picture than it did in real life.


I painted two coats of Tricycle and then scraped away all the chipping.  Once that was done, I applied the Miss Mustard Seed's Furniture Wax.  And Voila, here she is in all her chippy goodness.


Well, there it is, short and sweet.  What do you think?

By the way I have received my Miss Mustard Seed's Milk Paint shipment and am ready to take your orders!
Just visit my website here to place your order.

Linking Up to:
Classy Clutter - Spotlight Saturday Knot Too Shabby - WOW Us Weekend
Debbiedoo's - Newbie with a Twist Party
Homemaker on a Dime - Creative Bloggers' Party and Hop
Twigg Studios - Sunday Show Off


Pin It

Sunday, September 16, 2012

Miss Mustard Seed's Ironstone

Believe it or not, I have not fallen off the face of the planet. I currently have no computer, and really didn't want to create a post through my phone. Well I finally figured some kind of post is better than none.

I will be a retailer of Miss Mustard Seed's Milk Paint and got a few colors in a sample kit to try out. The paint is much different than any paint I've ever used. As you probably know' it's a powdered paint you mix with water. The plus to that is, it has an unlimited shelf life. You just mix what you need as you go.

I tried my hand with the color Ironstone on this table and chairs. (After publishing, I realized the pictures just all show up at the end.)

Typing on my phone is quite tedious, so I'll keep this short. Here is the finished project. (Again, just see all the pics at the end).

I can't wait to get my hands on the rest of the colors!

Thanks for stopping by!!

Jeanne


Friday, July 27, 2012

My Little Desk Grows Up

Pin It

I bought this little desk a few years ago at a garage sale.  It's been a perfect piece to have in our great room area, since it didn't take up a lot of space.  I recently got another desk, so I thought I'd give this a makeover to make it look more "grown up" before sending it off to a new home.


It was just feeling unsophisticated.


I decided to give Annie Sloan's Aubusson Blue a try on this one.  I love this color, and I'm so glad I finally found a project to use it on.  I also knew I wanted a darker top.  I wanted to try Minwax Poly Shade, which is polyurethane and stain all in one.  This was laziness a time saving idea on my part, as that way I just had to paint right over the existing finish.  No sanding, staining, and clear coating for this one.  Without further ado, here is my desk all sophisticated and grown up.


I thought the chair I recently painted for my first Miss Mustard Seed's Milk Paint project would look great with the desk.  You can read about that makeover here.  So here she is with the chair.


As usual, thanks so much for stopping by!


Blessings!


Jeanne


Linking Up to:


2805 - Potpourri Friday
The Dedicated House - Make it Pretty Monday
Homemaker on a Dime - Creative Bloggers' Party & Hop
Miss Mustard Seed - Furniture Feature Friday
Serendipity and Spice - Manic Monday

Thursday, April 5, 2012

A Little Table for a Friend

The story behind this little table is just so cool!  My daughter-in-law was sprucing up her house and and sent me a text saying, "Do you want this?  I'm putting it by the road otherwise".  Here's the table..............


So I'm sure you've guessed.  My response was, "Yes!".  Now here comes the really awesome part of the story.  While out to lunch with my dear friend, Debbie, she mentioned she was on the lookout for a small little side table to put next to her couch.  She had just rearranged her family room, and didn't have room for her existing end table by the couch.  I got so excited!  I asked her about what size she wanted.  And she showed me pretty much the exact size of this little table!  I pulled out my phone and showed her what I had just gotten the week before from my daughter-in-law.  She almost cried at God's perfect provision!  It was exactly what she was looking for!  Told you it was a great story!  Once we discussed what she wanted, I got to work.


So here is the perfect little table I made over for my friend!


First, I used ASCP Old White.  It did take two coats to cover.  Then I applied clear wax.  After that, I did a little distressing with 100 grit sandpaper.  I then did a very light touch of dark wax mixed with mineral spirits, and wiped away.  Then, one more final coat of clear wax.  This was a quick easy transformation!


Debbie was thrilled with her table!  I think God loves to give us these little surprises and see us smile.


Thanks so much for stopping by.


Blessings!


Jeanne

Pin It


Friday, September 23, 2011

The Beast

You may remember the peek at this buffet at the end of my last furniture makeover on a coffee table.  Here it is again in case you missed it.


I think I will name this piece, "The Beast"!  It tried to beat me, but I finally overcame!  I learned many lessons through the process of overcoming this beast.  Some of those lessons involved persevering and patience.  Some were more technical.  Like, be sure you sand and sand and sand when planning on staining.  And when you think you've sanded enough........sand some more.  This is the first time I've attempted staining.  So get ready for a really horrifying sight!  Here's my first attempt at staining the top of this guy. (Yes, this one is a guy).


Not quite the look I was going for.

The next frustration came when I was trying to put all the hardware back on.  For some reason the doors wouldn't close and some of the handles kept falling out of the side pieces.  I still don't understand why this happened.  My wonderful son, Peter, gave me a helping hand and got it all back together again.  I never could have gotten this done without him!  I didn't get any pictures of this process, but you get the idea.

I've also learned that I need to draw the line at how much money to put into a piece that I'm selling.  I was originally going to put knobs where the key holes are, because there were no keys and one of the locks was broken.  I ended up spending $45 to get keys made and get the post repaired on the broken lock.  I'm just not sure it was a cost effective move on my part.  What do you think?

Ok, enough of my rambling.  Let me introduce you to "The Beast"..............


I guess he's not so much of a beast now.  


Much better.  Don't you think?


Do you think the keys were worth it?


If I spray paint the key, do you think the paint will stay on? 
 I wasn't sure with the locking and unlocking.


I'm glad I didn't give up.  I think my beast turned out to be a pretty handsome guy.  

My next challange is some modern looking furniture that a friend wants me to shabby up.  Is that a term?  Probably not, but that's what I'm calling it.  Anyway, thanks so much for stopping by!  I hope you enjoyed your visit!

Monday, September 19, 2011

A Look Back at the Begining

Now that I have this whole blogging thing a little more figured out, I thought I'd repost the piece that I started it all with back in July of this year (2011).  I know more about the great sharing that goes on through linky parties and wanted a chance to share this one with more people than I did the first go round. 

Although I've been painting my own funiture and even my cabinets over the years, I never really researched the proper way to do it until recently.  I got my first real "lesson" in painting furniture from an ebook I purchased from Mandie over at Altar'd Designs.  She gave lots of great tips!  Since then I have found some very helpful blogs with tutorials.  My number one "go to" blog would have to be Miss Mustard Seed!  I am so thankful to her for sharing her wealth of knowledge so generously.  There are tons of other blogs out there with some great tutorials on some techniques I still haven't tried.  

Anyway, that's a little bit about my blogging and furniture transformation journey.  So, here's the piece I started it all with........

This is the before of course!  I took this picture at the estate sale where I purchased the desk.


The after is SO much better!


I did this little crackle look using Elmer's glue.


I was pleased with the final result.

Thank you so much for stopping by.  Please let me know what you think.  I look forward to "meeting" many more of you through blogland!

Blessings!

Thursday, September 8, 2011

Coffee Table Makeover

Well, here's another one of those pieces that just kind of "spoke to me" as I began to work on it.  I had one idea in mind, and then it just took on a life of it's own as I went.  I found this gem at an estate sale on the last day in the afternoon.  This one particular company in my area practically gives things away at that point in the day.   So needless to say I got a steal of a deal!  Anyway, here is a little peek at the before:

I really liked that this had a drawer.  And the turned legs of course.

I had a time making the top of this piece cooperate.  Although the table is solid wood, there was a formica layer on top.  I used Killz as recommended by others.  But I got a splotchy pattern that showed through when I put on the first layer of dark brown paint.  At that point I decided not to put on another layer of the brown.  I proceeded to lightly sand that layer and then added a dry brush layer of antique white.  Then I put a glaze made with the dark brown over the entire piece.

And here she is!

I kept the original hardware and just painted them.

Just a little detail

I am happy with the final result.

Here's a peek at my next project.


Thank you so much for stopping by.  Please come back often to check out what's new.

Blessings!  Jeanne